目次
記事の概要
目的
RustコードをWebAssembly(以下、Wasm)にコンパイルし、Reactから呼び出す一連の流れを紹介します。
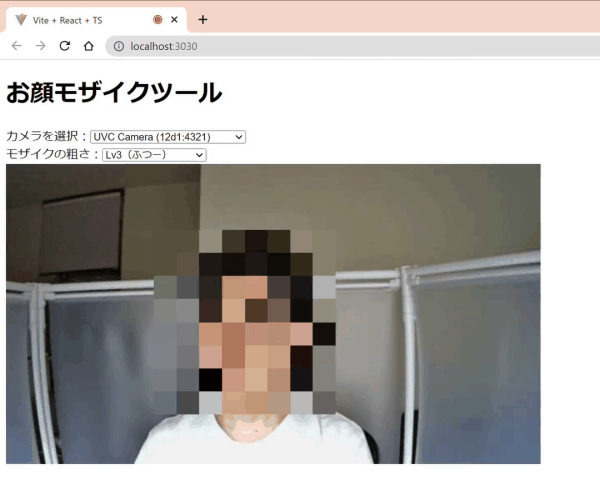
完成イメージ
カメラから取得した映像に対して、「顔検出」→「モザイク処理」を行うWebアプリケーションです。
想定読者
この記事はWasmに関心のあるエンジニアを対象に書いています。ReactやRust(およびそれらに関連するパッケージマネージャ)の知識があるのが望ましいですが、なくても雰囲気は掴めるかと思います。
環境構築
筆者とPC環境が異なっても再現性を保つため、Dockerコンテナで開発・実行する手順を解説します。Docker Desktopをインストールするなど、Dockerを実行できるようにしておいてください。Dockerのベースイメージにはdebianを選び、必要なパッケージをインストールするところから手順を示しています。そのため、ホスト環境で実行したい場合もほぼ同様の手順でできると思います。
docker-compose.ymlとDockerfileを作成する
任意のフォルダにdocker-compose.ymlとDockerfileを作成します。
├── docker-compose.yml  # 作成
└── Dockerfile          # 作成
docker-compose.ymlには以下のコードを記述します。
version: "3.8"

services:
  wasm-handson:
    build: .
    ports:
      - 3030:3030
      - 8080:8080
    tty: true
    working_dir: /work
    volumes:
      - ./work:/work
docker-compose.ymlの06~08行目ではWebサーバのリッスンポートを指定します。ホスト環境で3030や8080番ポートを既に使用中の場合は、任意の未使用ポートの番号に書き換えてください。
Dockerfileには以下のコードを記述します。
FROM debian:stable-slim

RUN apt update && apt install -y curl tree npm libssl-dev build-essential pkg-config

# Rustをサイレントインストール(cargo、rustc、rustupコマンドなどがインストールされる)
ENV RUST_HOME /usr/local/lib/rust
ENV RUSTUP_HOME ${RUST_HOME}/rustup
ENV CARGO_HOME ${RUST_HOME}/cargo
RUN mkdir /usr/local/lib/rust && \
    chmod 0755 $RUST_HOME
RUN curl --proto '=https' --tlsv1.2 -sSf https://sh.rustup.rs > ${RUST_HOME}/rustup.sh \
    && chmod +x ${RUST_HOME}/rustup.sh \
    && ${RUST_HOME}/rustup.sh -y --default-toolchain stable
ENV PATH $PATH:$CARGO_HOME/bin

## toolchainを更新
RUN rustup update

## WebAssemblyへのコンパイル機能を有効化
RUN rustup target add wasm32-unknown-unknown

# wasm-pack(RustのコードをWebAssemblyに変換しnpmパッケージを構築するツール)をインストール
RUN cargo install wasm-pack

# cargo-make(タスクランナー)をインストール
RUN cargo install --force cargo-make
Dockerfileの06~14行目は、Dockerコンテナ内にRustをインストールすると自動ではPATHが通らないため記述しています。Dockerではなくホスト環境で実行する場合は、単に以下のコマンドだけで良いはずです。
curl https://sh.rustup.rs -sSf | sh -s -- -y --default-toolchain stable
また、23行目のwasm-packインストールについて補足します。M1チップのMac環境の場合、wasm-packのバージョンによってはWebAssembly変換時にno prebuilt wasm-opt binaries are available for this platform: Unrecognized target! To disableエラーが発生してしまいます。やや古いバージョンになってしまいますが、コミット指定でインストールするとエラーを回避できます(参考:https://github.com/rustwasm/wasm-pack/issues/913#issuecomment-992946748)。
RUN cargo install wasm-pack --git https://github.com/d3lm/wasm-pack --rev 713868b204f151acd1989c3f29ff9d3bc944c306
Dockerビルド・起動
以下のコマンドを実行すると、イメージのダウンロードやパッケージのダウンロード・インストールが行われ、コンテナが開始されます。PCの性能にもよりますが、初回は10分程度かかります。
docker-compose up -d
上のコマンドの実行が完了すると、作業フォルダ内に「work」フォルダが作成されています。これはdocker-compose.ymlの11~12行目でマウント(ホスト環境のフォルダをDockerコンテナから参照できるように)しているためです。つまり、ホスト環境のworkフォルダでの作業内容がコンテナ内のworkフォルダに反映されます。そのため、以降の手順でソースコードを編集する際は、ホスト環境の使い慣れたエディタで編集することができます。
├── work                # このフォルダが作成されている
├── docker-compose.yml
└── Dockerfile
また、以下のコマンドを実行するとコンテナ内に入ることができます。
docker-compose exec wasm-handson bash
root@f33222865e2f:/work#
以降の手順は、特に記載のない限りはコンテナ内でコマンドを実行するものとします。
ハンズオン1. 単純なプログラム
顔モザイクツールを作成する前に、Wasmの動作を理解するために単純なプログラムの作成から始めましょう。引数として受け取った2つの数値の和を返す単純な関数をRustで実装し、WasmにコンパイルしてJavascriptから呼び出してみます。ここではReactではなく単なるJavascriptからWebAssemblyを呼び出します。WebAssemblyの開発の流れを掴みやすいよう、RustやJavascriptのコードは最小限にしています。
なお、ハンズオン2(顔モザイクツール)はこのハンズオン1に依存しないため、スキップしていただいてもかまいません。
Rustのコードを記述
Dockerコンテナをビルドする過程でRustをインストール済みですので、Cargo(Rust のビルドシステム、およびパッケージマネージャ)を用いてRustのプロジェクトを作成しましょう。まず以下のコマンドを実行します。
root@f33222865e2f:/work# cargo new --lib wasm-handson1 && cd $_
このようなフォルダ構成になっていますので、Cargo.tomlとsrc/lib.rsを書き換えます。
work
└┬ wasm-handson1
 ├┬ src
 │└─ lib.rs     # 書き換え
 └─ Cargo.toml   # 書き換え
Cargo.tomlは、既存のコードに続けて以下のコードの10~11行目を記述します。Rustからコンパイルしたバイナリにはデフォルトで他のRustプログラムから利用する際に使われるメタデータなどが含まれています。Wasmではこれらのメタデータは不要なのでcrate-type に”cdylib”を指定し、削ぎ落とすようにしています。ちなみにcrate(クレート)とはRustにおけるコンパイルの単位です。
[package]
name = "wasm-handson1"
version = "0.1.0"
edition = "2021"

# See more keys and their definitions at https://doc.rust-lang.org/cargo/reference/manifest.html

[dependencies]

[lib]                   # 追記
crate-type = ["cdylib"] # 追記
src/lib.rsは、既存のコードを削除してから以下のコードを記述します。2つの符号付き32bit整数を引数として受け取り、その和を返す関数です。1行目の#[no_mangle]は「Rustコンパイラに次の関数の名前をマングリング(ハッシュ化)せずにコンパイルせよ」と指示するための属性です。これにより、Javascriptからaddという名前で関数にアクセスできるようになります。また、関数を公開して外部から呼び出せるようにするためpubキーワードを付けています。
#[no_mangle]
pub fn add(a: i32, b: i32) -> i32 {
    a + b
}
Wasmにコンパイル
以下のコマンドを実行することで、RustのコードをWasmにコンパイルできます。
root@f33222865e2f:/work/wasm-handson1# cargo build --target=wasm32-unknown-unknown --release
コンパイルされたファイルは、wasm-handson1/targetフォルダ内に配置されています。
work
└┬ wasm-handson1
 ├┬ src
 │└─ lib.rs
 ├┬ target                   # できる
 │├─ release                # できる
 │└─ wasm32-unknown-unknown # できる
 ├─ Cargo.lock
 └─ Cargo.toml
Javascriptを記述
HTMLファイルを作成し、その中にWebAssemblyを呼び出すJavascriptを記述していきます。wasm-handson1フォルダにindex.htmlを作成しましょう。
work
└┬ wasm-handson1
 ├┬ src
 │└─ lib.rs
 ├┬ target
 │├─ release
 │└─ wasm32-unknown-unknown
 ├─ Cargo.lock
 ├─ Cargo.toml
 └─ index.html                 # 作成
index.htmlには以下のコードを記述します。内容としては、bodyタグ内にinputボックスが3つあり、1つ目と2つ目のinputボックス内の数字を加算した結果を3つ目のinputボックスに表示するという非常にシンプルなものです。
<!DOCTYPE html>
<html lang="ja">
  <head>
    <meta charset="UTF-8" />
    <title>Hello, WebAssembly!</title>
    <script>
      const wasm =
        "./target/wasm32-unknown-unknown/release/wasm_handson1.wasm";
      fetch(wasm)
        .then((response) => response.arrayBuffer())
        .then((bytes) => WebAssembly.instantiate(bytes, {}))
        .then((results) => {
            const input1 = document.querySelector("input[name=input1]");
            const input2 = document.querySelector("input[name=input2]");
            const result = document.querySelector("input[name=result]");
            const calc = ()=>{
                result.value = results.instance.exports.add(Number(input1.value), Number(input2.value))
            }
            input1.addEventListener("keyup", calc, false);
            input2.addEventListener("keyup", calc, false);
            console.log(results.instance.exports.add(1, 2));
        });

</script>
  </head>
  <body>
    <div id="app">
        <input type="number" name="input1" value="">
        <span>+<span>
        <input type="number" name="input2" value="">
        <span>=<span>
        <input type="number" name="result" value="0" readonly>
    </div>
  </body>
</html>
09~18行目では以下の処理を実行しています。
- Fetch APIを用いてWasmファイルを読み込む
- response.arrayBufferでWasmファイルのデータをバイナリ配列に変換する
- WebAssembly.instantiateでバイナリ配列をインスタンス化する
- Wasmインスタンスからadd関数にアクセスし、呼び出す
さあ、このコードを実際にブラウザで動かしてみましょう。注意点として、Fetch APIはfile URIスキーマ(file:///path/to/file.ext のようにローカルにあるファイルにアクセスするときに使うスキーマ)をサポートしていないため、任意のWebサーバを用いてhttp URIスキーマでアクセスできるようにする必要があります。ここではnpmパッケージのhttp-serverを使用します。-pオプションで任意のポート番号を指定することができます。docker-compose.ymlで8080番ポート以外を指定した場合、8080の部分をそのポート番号に書き換えてください。
root@f33222865e2f:/work/wasm-handson1# npx -y http-server . -p 8080
ホスト環境のブラウザから「http://127.0.0.1:8080」にアクセスすると、下図のようなWebページが表示されます。1つ目、2つ目のinputボックスに数値を入力したとき、加算結果が3つ目のinputボックスに表示されれば成功です。

動作確認が終わったら、[ctrl]+[c]キーを押下してhttp-serverを終了します。
ハンズオン2. 顔モザイクツール
ここからは本記事のテーマである顔モザイクツールの作成に入っていきます。
ハンズオン1との主な違いは「WasmをReactから呼び出す」「Reactから呼び出しやすくするよう、Wasmをnpmパッケージ化する」という点です。
Rustのコードを記述
まず、作業フォルダを作成します。
root@f33222865e2f:/work# mkdir /work/wasm-handson2 && cd $_
今回は「1) 顔検出+モザイク処理を行うロジック」「2) 1)をテストするCLIツール」「3) 1)をWasmにコンパイルするためのラッパー」の3つに分けて作成します。それぞれ「packages/core」「packages/test-cli」「packages/wasm」としてpackagesフォルダ内に配置します。
root@f33222865e2f:/work/wasm-handson2# mkdir rust && cd $_
root@f33222865e2f:/work/wasm-handson2/rust# cargo new --lib packages/wasm
root@f33222865e2f:/work/wasm-handson2/rust# cargo new --lib packages/core
root@f33222865e2f:/work/wasm-handson2/rust# cargo new --bin packages/test-cli
root@f33222865e2f:/work/wasm-handson2/rust# touch Cargo.toml
root@f33222865e2f:/work/wasm-handson2/rust# touch packages/core/src/center_face.rs
root@f33222865e2f:/work/wasm-handson2/rust# touch packages/core/src/mosaic_face.rs
次に、顔検出用のモデルのダウンロードを行います。
root@f33222865e2f:/work/wasm-handson2/rust# curl "https://raw.githubusercontent.com/Star-Clouds/CenterFace/master/models/onnx/centerface.onnx" -o packages/core/centerface.onnx --create-dirs
ここまでの手順で、以下のファイル構成ができました。
work
├─ wasm-handson1
└┬ wasm-handson2
 └┬ rust
  └┬ packages
   ├─ core
   │  ├ src
   │  │ ├─ center_face.rs
   │  │ ├─ lib.rs
   │  │ └─ mosaic_face.rs
   │  ├─ Cargo.toml
   │  └─ centerface.onnx
   ├─ test-cli
   │  ├ src
   │  │ └─ main.rs
   │  └─ Cargo.toml
   ├─ wasm
   │  ├ src
   │  │ └─ lib.rs
   │  └─ Cargo.toml
   └ Cargo.toml
今回はpackagesフォルダ配下の「core」「test-cli」「wasm」をcargo-workspaceという仕組みでまとめて管理することにします。workspaceとしてまとめることで外部のクレートを共有できるため、ビルド時間を短縮できるなどのメリットがあります。
/work/wasm-handson2/rust/Cargo.tomlを次のように書き換えます。
[workspace]
members = [
    "packages/*",
]
core(顔検出+モザイク処理を行うロジック)
せっかくWasmで処理をさせるので、計算量が多い「顔検出+モザイク処理」機能を実装します。顔検出にはCenterFaceという学習済みモデルを用います。顔検出の結果はバウンディングボックスとして取得するよう後処理を行い、その領域に対して画像処理によりモザイクを施す、というものです。インターフェースとしては「画像データ(8ビット符号なし整数値の配列)、画像幅、画像高さ、モザイクの粗さ」を受け取るようにしています。
core/Cargo.tomlを次のように書き換えます。
[package]
name = "core"
version = "0.1.0"
edition = "2021"

# See more keys and their definitions at https://doc.rust-lang.org/cargo/reference/manifest.html

[lib]
crate-type = ["cdylib", "rlib"]

[dependencies]
image = "0.24.3"
tract-onnx = "0.16.5"

[[bin]]
name = "detect"
path = "src/detect.rs"

[features]
default = ["image"]
image = []
core/src/center_face.rsも書き換えます。
use std::cmp::{max, min};
use std::io::BufReader;

use tract_onnx::prelude::*;
use tract_onnx::prelude::tract_itertools::Itertools;
use tract_onnx::prelude::tract_ndarray::ArrayViewD;

#[cfg(feature = "image")]
use {
    image::{imageops, RgbImage},
    tract_onnx::prelude::tract_ndarray::Array4,
};

pub struct CenterFace {
    width: u32,
    height: u32,
    model: RunnableModel<TypedFact, Box<dyn TypedOp>, Graph<TypedFact, Box<dyn TypedOp>>>,
}

// #[derive(Debug, Clone, Serialize, Deserialize)]
#[derive(Debug, Clone)]
pub struct Face {
    pub x1: u32,
    pub y1: u32,
    pub x2: u32,
    pub y2: u32,
    pub score: f32,
}

impl CenterFace {
    pub fn new(width: u32, height: u32) -> TractResult<CenterFace> {
        let ws = (width / 32) as i32;
        let hs = (height / 32) as i32;
        let onnx_model = include_bytes!("../centerface.onnx");
        let model = onnx().model_for_read(&mut BufReader::new(&onnx_model[..]))?
            .with_input_fact(0, InferenceFact::dt_shape(f32::datum_type(), tvec![1, 3, height as i32, width as i32]))?
            .with_output_fact(0, InferenceFact::dt_shape(f32::datum_type(), tvec![1, 1, 8 * hs, 8 * ws]))?
            .with_output_fact(1, InferenceFact::dt_shape(f32::datum_type(), tvec![1, 2, 8 * hs, 8 * ws]))?
            .with_output_fact(2, InferenceFact::dt_shape(f32::datum_type(), tvec![1, 2, 8 * hs, 8 * ws]))?
            .with_output_fact(3, InferenceFact::dt_shape(f32::datum_type(), tvec![1, 10, 8 * hs, 8 * ws]))?
            .into_optimized()?
            .into_runnable()?;

        Ok(CenterFace { width, height, model })
    }

    #[cfg(feature = "image")]
    pub fn detect_with_resize(&self, image: &RgbImage) -> TractResult<Vec<Face>> {
        let org_width = image.width();
        let org_height = image.height();

        let image = imageops::resize(
            image, self.width, self.height, imageops::FilterType::Triangle,
        );

        let mut faces = self.detect_image(&image)?;

        for i in 0..faces.len() {
            faces[i].x1 = faces[i].x1 * org_width / self.width;
            faces[i].x2 = faces[i].x2 * org_width / self.width;
            faces[i].y1 = faces[i].y1 * org_height / self.height;
            faces[i].y2 = faces[i].y2 * org_height / self.height;
        }

        Ok(faces)
    }

    #[cfg(feature = "image")]
    pub fn detect_image(&self, image: &RgbImage) -> TractResult<Vec<Face>> {
        let image: Tensor = Array4::from_shape_fn(
            (1, 3, self.height as usize, self.width as usize),
            |(_, c, y, x)| {
                image[(x as _, y as _)][c] as f32
            },
        ).into();

        let faces = self.detect(image)?;

        Ok(faces)
    }


    pub fn detect(&self, image: Tensor) -> TractResult<Vec<Face>> {
        // image: (1, 3, height, width)

        let result = self.model.run(tvec!(image))?;

        let heatmap = result.get(0).unwrap().to_array_view::<f32>()?;
        let scale = result.get(1).unwrap().to_array_view::<f32>()?;
        let offset = result.get(2).unwrap().to_array_view::<f32>()?;

        let faces = self.decode(heatmap, scale, offset)?;

        Ok(faces)
    }

    fn decode(
        &self,
        heatmap: ArrayViewD<f32>,
        scale: ArrayViewD<f32>,
        offset: ArrayViewD<f32>,
    ) -> TractResult<Vec<Face>> {
        let threshold = 0.5;

        let ny = heatmap.shape()[2];
        let nx = heatmap.shape()[3];

        let mut faces = Vec::new();

        for i in 0..ny {
            for j in 0..nx {
                let score = heatmap[[0, 0, i, j]];
                if score <= threshold {
                    continue;
                }

                let s0 = scale[[0, 0, i, j]].exp() * 4.0;
                let s1 = scale[[0, 1, i, j]].exp() * 4.0;
                let o0 = offset[[0, 0, i, j]] + 0.5;
                let o1 = offset[[0, 1, i, j]] + 0.5;

                let x1 = max(0, ((j as f32 + o1) * 4.0 - s1 / 2.0) as u32);
                let y1 = max(0, ((i as f32 + o0) * 4.0 - s0 / 2.0) as u32);

                let x1 = min(x1, self.width);
                let y1 = min(y1, self.height);

                let x2 = min(x1 + s1 as u32, self.width);
                let y2 = min(y1 + s1 as u32, self.height);

                faces.push(Face { x1, x2, y1, y2, score });
            }
        }

        Ok(Self::non_maximum_suppression(faces))
    }

    fn non_maximum_suppression(faces: Vec<Face>) -> Vec<Face> {
        let threshold = 0.3;

        let faces: Vec<Face> = faces.into_iter()
            .sorted_by(|a, b| b.score.partial_cmp(&a.score).unwrap())
            .collect();
        let n = faces.len();
        let mut merged = vec![false; n];

        let mut output = Vec::new();

        for i in 0..n {
            if merged[i] { continue; }

            output.push(faces[i].clone());

            let area0 = (faces[i].x2 - faces[i].x1 + 1) * (faces[i].y2 - faces[i].y1 + 1);

            for j in i + 1..n {
                if merged[j] { continue; }

                let in_x0 = if faces[i].x1 > faces[j].x1 { faces[i].x1 } else { faces[j].x1 };
                let in_y0 = if faces[i].y1 > faces[j].y1 { faces[i].y1 } else { faces[j].y1 };
                let in_x1 = if faces[i].x2 < faces[j].x2 { faces[i].x2 } else { faces[j].x2 };
                let in_y1 = if faces[i].y2 < faces[j].y2 { faces[i].y2 } else { faces[j].y2 };

                if in_x1 <= in_x0 - 1 || in_y1 <= in_y0 - 1 { continue; }
                let in_area = (in_y1 - in_y0 + 1) * (in_x1 - in_x0 + 1);
                let area1 = (faces[j].y2 - faces[j].y1 + 1) * (faces[j].x2 - faces[j].x1 + 1);

                let score = in_area as f32 / (area0 + area1 - in_area) as f32;
                if score > threshold {
                    merged[j] = true;
                }
            }
        }

        output
    }
}
core/src/lib.rsも書き換えます。
pub mod center_face;
pub mod mosaic_face;
core/src/mosaic_face.rsも書き換えます。
use crate::center_face::CenterFace;
use image::{imageops, EncodableLayout, ImageBuffer, Rgb, Rgba};

fn rgba8_to_rgb8(
    input: image::ImageBuffer<Rgba<u8>, Vec<u8>>,
) -> image::ImageBuffer<Rgb<u8>, Vec<u8>> {
    let width = input.width() as usize;
    let height = input.height() as usize;

    let input: &Vec<u8> = input.as_raw();
    let mut output_data = vec![0u8; width * height * 3];
    let mut i = 0;
    for chunk in input.chunks(4) {
        output_data[i..i + 3].copy_from_slice(&chunk[0..3]);
        i += 3;
    }
    image::ImageBuffer::from_raw(width as u32, height as u32, output_data).unwrap()
}

// mosaic_coarseness : モザイクの粗さ(細 1〜100 粗)
pub fn mosaic_face(buf: Vec<u8>, width: u32, height: u32, mosaic_coarseness: u32) -> Vec<u8> {
    let mut image: ImageBuffer<Rgba<u8>, Vec<_>> =
        ImageBuffer::from_raw(width, height, buf).unwrap();
    let image_rgb = rgba8_to_rgb8(image.clone());
    let scale = 2;

    let wf = image_rgb.width() / 32 / scale;
    let hf = image_rgb.height() / 32 / scale;
    let cf = CenterFace::new(32 * wf, 32 * hf).unwrap();
    println!("model initialized");
    let faces = cf.detect_with_resize(&image_rgb).unwrap();
    println!("{} faces are detected", faces.len());

    let img_width = image.width();
    let img_height = image.height();
    let rect_buffer = 32;

    for f in faces {
        let fx = std::cmp::max(f.x1 - rect_buffer, 0);
        let fy = std::cmp::max(f.y1 - rect_buffer, 0);
        let fw = std::cmp::min(f.x2 + rect_buffer, img_width) - fx;
        let fh = std::cmp::min(f.y2 + rect_buffer, img_height) - fy;

        let cropped = imageops::crop(&mut image, fx, fy, fw, fh).to_image();

        let ratio = 1.0 as f32 / mosaic_coarseness as f32;
        let resized = imageops::resize(
            &cropped,
            (fw as f32 * ratio) as u32,
            (fh as f32 * ratio) as u32,
            imageops::FilterType::Nearest,
        );
        let mosaic = imageops::resize(&resized, fw, fh, imageops::FilterType::Nearest);
        image::imageops::overlay(&mut image, &mosaic, fx.into(), fy.into());
    }
    return image.as_bytes().to_vec();
}
test-cli(coreをテストするCLIツール)
core(顔検出+モザイク処理を行うロジック)が正しく動作しているか確認するためのツールを作ります。画像ファイルをcoreのインターフェースに合わせて変換し、処理結果をまた画像に変換して保存させてみます。
test-cli/Cargo.tomlを次のように書き換えます。
[package]
name = "test-cli"
version = "0.1.0"
edition = "2021"

# See more keys and their definitions at https://doc.rust-lang.org/cargo/reference/manifest.html

[dependencies]
image = "0.24.3"
core = { path = "../core" }
test-cli/src/main.rsを書き換えます。
use core::mosaic_face::mosaic_face;
use image::{io::Reader as ImageReader, RgbaImage};
use std::path::Path;

fn main() {
    let path = Path::new("./packages/test-cli/src/test.png");
    let img = ImageReader::open(path).unwrap().decode().unwrap();
    let width = img.width();
    let height = img.height();
    let vec = img.as_bytes().to_vec();
    let mosaic_vec = mosaic_face(vec, width, height, 50);
    let mosaic_image = RgbaImage::from_vec(width, height, mosaic_vec).unwrap();
    let _ = mosaic_image.save("./packages/test-cli/src/result.png");
}
テストを実行するにはtest-cli/src/test.png(人間の顔写真を含むPNG形式の画像)を保存し、以下のコマンドを実行します。初回は依存する外部クレートのダウンロードなどが行われるため、環境にもよりますが10分程度かかります。
root@f33222865e2f:/work/wasm-handson2/rust# cargo run -p test-cli
実行が完了すると、test-cli/srcフォルダ内にresult.pngが生成されています。
wasm(coreをWasmにコンパイルするためのラッパー)
coreをWasm用にラップするだけのクレートです。wasm/Cargo.tomlを以下のように書き換えます。
[package]
name = "wasm"
version = "0.1.0"
edition = "2021"

# See more keys and their definitions at https://doc.rust-lang.org/cargo/reference/manifest.html

[lib]
crate-type = ["cdylib"]

[dependencies]
core = { path = "../core" }
wasm-bindgen = "0.2.82"

# M1チップのMac環境対応
[package.metadata.wasm-pack.profile.release]
wasm-opt = false
wasm/src/lib.rsも書き換えます。
use core::mosaic_face::mosaic_face;

use wasm_bindgen::{prelude::wasm_bindgen, Clamped};

#[wasm_bindgen]
pub fn exec_mosaic_face(
    buf: Clamped<Vec<u8>>,
    width: u32,
    height: u32,
    mosaic_coarseness: u32,
) -> Vec<u8> {
    mosaic_face(buf.0, width, height, mosaic_coarseness)
}
Wasmにコンパイル
Rustでnpmパッケージを構築するためのツールであるwasm-packを使用します。手短に説明すると「wasm-pack build」コマンドは内部的には以下を実行し、最終的にはnpm パッケージが pkg フォルダに生成されます。
- RustコードをWasmにコンパイルする。
- Wasmファイルをnpmが理解できるモジュールにラップするJavaScriptファイルを生成する。
- pkgフォルダを作成し、1のWasmコードと2のJavascriptファイルをそこに移動する。
- Cargo.tomlと等価なpackage.jsonを生成する。
下記コマンドでコンパイルできます。初回は10分程度かかります。
root@f33222865e2f:/work/wasm-handson2/rust# cd packages/wasm
root@f33222865e2f:/work/wasm-handson2/rust/packages/wasm# wasm-pack build --target web
wasm-handson2/rust/packages/wasmフォルダ内にpkgフォルダが作成されています。
work
├─ wasm-handson1
└┬ wasm-handson2
  └┬ rust
  └┬ packages
   ├─ core
   ├─ test-cli
   └─ wasm
      ├ pkg        # これが作成された
      ├ src
      └ Cargo.toml
このpkgフォルダをReactのsrcフォルダにコピーして使うことになります。
Reactのコードを記述
viteでプロジェクトを作り、react-webcamというパッケージをインストールします。
root@f33222865e2f:/work/wasm-handson2/rust/packages/wasm# cd /work/wasm-handson2/
root@f33222865e2f:/work/wasm-handson2# npm -y create vite@latest react -- --template react-ts
root@f33222865e2f:/work/wasm-handson2# cd react
root@f33222865e2f:/work/wasm-handson2/react# npm install react-webcam
react/vite.config.tsを書き換えます。docker-compose.ymlでの指定に合わせるように、ポート番号を指定します。
import { defineConfig } from "vite";
import react from "@vitejs/plugin-react";

// https://vitejs.dev/config/
export default defineConfig({
  plugins: [react()],
  server: {         // 追記
    port: 3030,     // 追記
  },                // 追記
});
package.jsonを書き換えます。コンテナ外(ホスト環境のブラウザ)からアクセスするため、scriptsのdevに「–host」をつけます。
{
  "name": "react",
  "private": true,
  "version": "0.0.0",
  "type": "module",
  "scripts": {
    "dev": "vite --host",  // 追記
    "build": "tsc && vite build",
    "lint": "eslint src --ext ts,tsx --report-unused-disable-directives --max-warnings 0",
    "preview": "vite preview"
  },
  // 省略
}
tsconfig.jsonを書き換えます。wasm-packで生成されたnpmパッケージをコンパイル対象外にします。
{
  // 省略
  "include": ["src"],
  "exclude": ["src/pkg/"],  // 追記
  "references": [{ "path": "./tsconfig.node.json" }]
}
wasmパッケージをReactのsrc内にコピーします。
root@f33222865e2f:/work/wasm-handson2/react# cp -r ../rust/packages/wasm/pkg src/pkg
src/main.tsxを書き換えます。index.cssのインポートを削除しただけです。
import React from 'react'
import ReactDOM from 'react-dom/client'
import App from './App.tsx'

ReactDOM.createRoot(document.getElementById('root')!).render(
  <React.StrictMode>
    <App />
  </React.StrictMode>,
)
src/App.tsxを次のように書き換えます。
import { useCallback, useEffect, useRef, useState } from "react";
import Webcam from "react-webcam";
import init, { exec_mosaic_face } from "./pkg/wasm";

const videoConstraints = {
  width: 640,
  height: 360,
  facingMode: "user",
};

export const App = () => {
  const [isWasmLoaded, setIsWasmLoaded] = useState(false);
  const [image, setImage] = useState<HTMLImageElement | null>(null);
  const [mosaicCoarseness, setMosaicCoarseness] = useState(30);

  const [deviceId, setDeviceId] = useState({});
  const [devices, setDevices] = useState<MediaDeviceInfo[]>([]);

  const handleDevices = useCallback(
    (mediaDevices: MediaDeviceInfo[]) => {
      const devices = mediaDevices.filter(({ kind }) => kind === "videoinput");
      setDeviceId(devices[0].deviceId);
      setDevices(devices);
    },
    [setDevices]
  );

  useEffect(() => {
    void navigator.mediaDevices.enumerateDevices().then(handleDevices);
  }, [handleDevices]);

  const webcamRef = useRef<Webcam>(null);
  const canvasRef = useRef<HTMLCanvasElement>(null);

  const capture = useCallback(() => {
    const imageSrc = webcamRef.current?.getScreenshot();
    const newImage = new Image();
    if (typeof imageSrc !== "string") {
      return;
    }
    newImage.src = imageSrc;
    newImage.onload = function () {
      setImage(newImage);
    };
  }, [webcamRef]);

  useEffect(() => {
    void init().then(
      () => {
        setIsWasmLoaded(true);
        console.log("WASMの読み込みに成功しました。");
      },
      (err) => {
        console.error("WASMの読み込みに失敗しました。", err);
      }
    );

    const intervalId = setInterval(() => {
      capture();
    }, 500);

    return () => {
      clearTimeout(intervalId);
    };
  }, []);

  useEffect(() => {
    if (!image || !isWasmLoaded) return;
    const canvasRenderingContext = canvasRef.current?.getContext("2d");
    if (!canvasRenderingContext) {
      console.log("canvasが見つかりませんでした。");
      return;
    }
    canvasRenderingContext.drawImage(image, 0, 0, image.width, image.height);
    const imageData = canvasRenderingContext.getImageData(
      0,
      0,
      image.width,
      image.height
    );

    const mosaicResult = exec_mosaic_face(
      imageData.data,
      image.width,
      image.height,
      mosaicCoarseness
    );

    const imagedata = new ImageData(
      new Uint8ClampedArray(mosaicResult.buffer),
      image.width
    );
    canvasRef.current?.getContext("2d")?.putImageData(imagedata, 0, 0);
  }, [image, isWasmLoaded, mosaicCoarseness]);

  return (
    <>
      <header>
        <h1>お顔モザイクツール</h1>
      </header>
      <div>
        <span>カメラを選択:</span>
        <select onChange={(e) => setDeviceId(e.target.value)}>
          {devices.map((device) => {
            return (
              <option key={device.deviceId} value={device.deviceId}>
                {device.label}
              </option>
            );
          })}
        </select>
      </div>
      <div>
        <span>モザイクの粗さ:</span>
        <select
          value={mosaicCoarseness}
          onChange={(e) => {
            setMosaicCoarseness(Number(e.target.value));
          }}
        >
          <option value="10">Lv1(細かい)</option>
          <option value="20">Lv2(やや細かい)</option>
          <option value="30">Lv3(ふつー)</option>
          <option value="40">Lv4(やや粗い)</option>
          <option value="50">Lv5(粗い)</option>
        </select>
      </div>

      <div style={{ position: "relative" }}>
        <Webcam
          audio={false}
          width={720}
          height={360}
          ref={webcamRef}
          screenshotFormat="image/png"
          videoConstraints={{ ...videoConstraints, deviceId: deviceId }}
        />
        <canvas
          ref={canvasRef}
          width={image?.width}
          height={image?.height}
          style={{
            maxWidth: "100%",
            maxHeight: "400px",
            position: "absolute",
            top: 0,
            left: 0,
          }}
        />
      </div>
    </>
  );
};

export default App;
動作確認をするために以下のコマンドを実行します。
root@f33222865e2f:/work/wasm-handson2/react# npm run dev
コンテナ内でWebサーバが稼働しますので、ホスト環境のブラウザから「http://127.0.0.1:3030」にアクセスすることで動作を確認できます。ポート番号(3030)部分は、docker-compose.ymlやvite.config.tsで指定した番号になります。確認が終わったら、コンテナ内で[ctrl]+[c]キー押下で終了します。
タスクランナーの設定
ここまでの手順で、ReactでWasmを実行するところまでできました。しかし、わざわざWasmをコンパイルしたり、コンパイルしたnpmパッケージをコピーしたり、Reactを実行したりするのが面倒です。そこで、タスクランナーを設定してみましょう。ここで使うのはcargo-makeというツールです。cargo-makeバイナリをインストールする必要がありますが、Dockerコンテナビルドの過程でインストール済みです。
wasm-handson2フォルダにMakefile.tomlを作成します。
work
├─ wasm-handson1
└┬ wasm-handson2
 ├─ react
 ├─ rust
 └─ Makefile.toml   # 作成
タスクは次のように記述します。
[tasks.build-wasm]
script_runner = "@shell"
script = '''
cd rust/packages/wasm
wasm-pack build --target web
'''
workspace = false

[tasks.cp-wasm]
script_runner = "@shell"
script = '''
cp -r rust/packages/wasm/pkg react/src
'''
workspace = false
dependencies = ["build-wasm"]

[tasks.npm-install]
script_runner = "@shell"
script = '''
cd react
npm install
'''
workspace = false

[tasks.run-react]
script_runner = "@shell"
script = '''
cd react
npm run dev
'''
workspace = false
dependencies = ["cp-wasm", "npm-install"]
[]で括った名称(tasks.を除いた値)を指定すると、scriptに記述したコマンドが実行されます。また、dependenciesを指定すると、指定したタスクを事前に実行させることができます。
root@f33222865e2f:/work# cd /work/wasm-handson2/

# wasmをビルドしたいとき
root@f33222865e2f:/work/wasm-handson2# cargo make --makefile Makefile.toml build-wasm

# reactを実行したいとき
root@f33222865e2f:/work/wasm-handson2# cargo make --makefile Makefile.toml run-react
まとめ
以上の通り、RustによるWasm開発の一連の流れを紹介しました。今回は説明を割愛した部分も多々ありますが、まず動くものを作ってから詳細を調べ始める、という学習方法もアリだと思います。ぜひみなさんのイメージするWasmアプリをお手元で作ってみてください。
参考文献
- WebAssembly 開発環境構築の本
- Rust から WebAssembly にコンパイルする
- The Rust Programming Language 日本語版 Cargoのワークスペース
- cargo-makeによるプロジェクト・ビルド入門
- cargo workspaceを使ってRustのビルド時間を改善する